


Your first export
1. Build the map in QGIS
The plugin exports the project as it is, so compose it first: load your layers, style them, and set the canvas to the view you want as the map’s starting point.
Layer order matters and is taken from the QGIS Layers panel - the topmost layer draws on top, exactly as on the QGIS canvas.
2. Open the plugin
Web → QGIS2WebMap by NIKA → Create web map, the toolbar button, or Ctrl+Alt+W (Cmd+Alt+W on macOS).
The dialog is non-modal: QGIS stays usable behind it. Reorder or rename layers in the Layers panel and the plugin’s list follows immediately - there is nothing to refresh.
3. Name the map
The Map name field at the top of the Map tab is the title shown on the exported map. Leave it blank to use the project title.

4. Choose the layers
The plugin exports the layers already open in this QGIS project. There is no file to browse for and no source to pick - build the map you want in QGIS, and the plugin exports what you built.
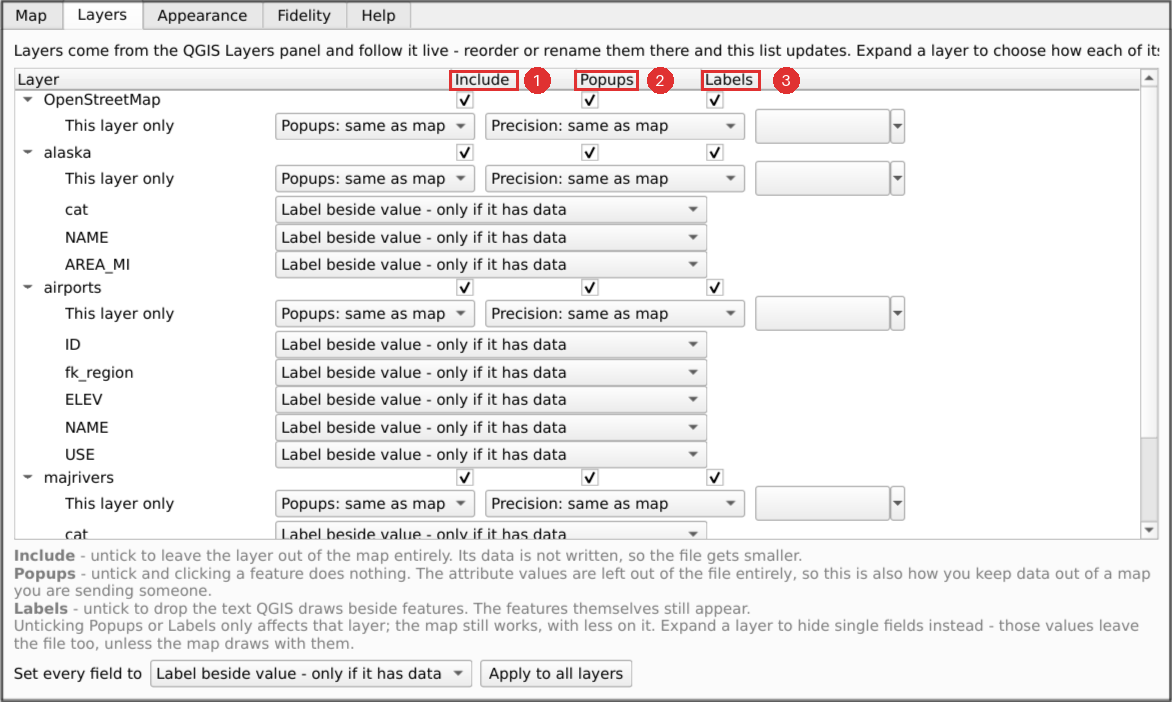
On the Layers tab, each layer has three tick boxes:
| Box | Ticked | Unticked |
|---|---|---|
| Include | The layer is in the map | The layer is left out entirely, and its data is not written to the file |
| Popups | Clicking a feature shows its attributes | Clicking does nothing, and the attribute values are not written to the file |
| Labels | Text you set in QGIS is drawn beside features | No text; the features themselves are unaffected |
Two of these are worth knowing about beyond the tidiness:
- Unticking Popups is how you keep attribute data out of a map you are sending someone. The values are not merely hidden - they never reach the file, so there is nothing to find by opening it in a text editor.
- Unticking Include or Popups makes the map file smaller, which matters because it carries all of its data inside it. See sharing a map.
Unticking any of them affects that layer only. The map still works, with less on it. Settings are remembered per layer, and they survive changes to the project.
Hiding one field rather than all of them. Expand a layer to list its fields, each with its own setting. Do not show this field removes that field’s values from the file, exactly as unticking Popups does for the whole layer; the other settings choose how the value is laid out in the popup. Use Set every field to with Apply to all layers to set them in bulk.
One exception, and it is deliberate: a field the map draws with - the one a categorised or graduated style is based on, the one labels read their text from, or an extrusion height - stays in the file even when you hide it. Removing it would not conceal anything, since it is on the map either way; it would only break the drawing.
5. Preview
Preview builds the map and opens it in your default browser. Nothing opens a browser on its own - only this button does.
Click the dot at Preview’s right end to switch live preview on; it turns red. Preview then serves the map from your own machine and the tab updates by itself as you change settings, keeping your position on the map. Change a colour or switch a layer off and watch it happen. While it runs the button reads Live - press it again, or close the tab, to stop. With the dot off, Preview simply opens the map as it is now. Either way, a preview never writes your map file; Export does that.
If the preview cannot be served - a firewall or a locked-down machine - it opens as a file automatically and tells you so. Nothing is lost.
6. Share it
On the Map tab, under Export:
- Pick Export as: Standalone HTML (one file, opens by double-click),
Share ZIP (for email, when a filter blocks
.html) or Folder (for a web server). - Set Save to - press Choose and it offers a name beside your project.
- Press Export, in the top-right corner of the dialog.

Share, beside it, has Copy file path to paste it anywhere and Show in file manager to find it.
If Export is greyed out, the reason is in the bar at the foot of the dialog.
7. Check the Fidelity tab
Before sending the map on, look at Fidelity. It lists everything that changed on the way out of QGIS - symbology that could not be translated exactly, settings that will not appear, layers that were left out. Nothing is dropped silently.

That report before the export, rather than a surprise after it, is the main difference from qgis2web if you are choosing between the two.